Deploying a Ruby on Rails application to Google Kubernetes Engine: a step-by-step guide - Part 4: Enable HTTPS using Let’s Encrypt and cert-manager
Introduction
Update: I’ve now created a premium training course, Kubernetes on Rails, which takes some inspiration from this blog post series but updated with the latest changes in Kubernetes and Google Cloud and greatly simplified coursework based on feedback I got from these blog posts. All packaged up in an easy-to-follow screencast format. Please check it out! ☺️ - Abe
Welcome to part four of this five-part series on deploying a Rails application to Google Kubernetes Engine. If you’ve arrived here out-of-order, you can jump to a different part:
Part 1: Introduction and creating cloud resources
Part 2: Up and running with Kubernetes
Part 3: Cache static assets using Cloud CDN
Part 5: Conclusion, further topics and Rails extras
Unfortunately TLS/SSL certificates is one area that GCP/GKE is at a major deficit compared to AWS, the latter of which has the AWS Certificate Manager (ACM) which can easily provision SSL/TLS certificates, attach them directly to load balancers (or CloudFront - their CDN), and automatically renew them. I’ve said many times on Twitter that this is the primary feature that I really miss migrating from AWS:
I think the only thing I would really miss moving to Google Cloud right now is AWS's certificate manager (ACM) and its ALB/ELB integration
— Abe Voelker (@abevoelker) March 9, 2017
And I’m not the only one:
Really impressed by Google Cloud Platform so far. It's like AWS minus the obfuscated Amazonspeak, and with a better console.
— Brandur (@brandur) March 13, 2018
The only service I miss is ACM — zero-hassle HTTPS is *such* a killer feature. A Kubernetes/Let's Encrypt Rube Goldberg machine just isn't the same.
Instead we will be using Let’s Encrypt to provision free certificates using cert-manager, which is a Kubernetes add-on that we’ll install into our cluster that automatically performs the magic handshakes with Let’s Encrypt to verify we own the domains we need certificates for and handles certificate renewals.
Let’s Encrypt allows validating domains via its ACME protocol by either serving a special URI via HTTP or by serving a special TXT record via DNS. While cert-manager supports both methods, and HTTP seems to be the most popular, I had nothing but problems with it so I will be demonstrating the DNS TXT record method in this post. If you want to try the HTTP method there is an excellent tutorial here, however apparently it is broken as of this writing.
I will demonstrate using GCP as the DNS provider, which along with AWS Route 53, Cloudflare, and Azure are currently the only DNS providers cert-manager supports (see the project’s example acme-issuer.yaml for how to modify the Issuer manifest to accommodate other DNS providers). Unfortunately if you don’t use one of the aforementioned DNS providers, you won’t be able to follow along - maybe try the aforementioned HTTP method tutorial instead.
DNS service account
First, we need to enable the DNS API:
$ gcloud services enable dns.googleapis.com
Now, we are going to need a service account with privileges to modify our DNS:
$ gcloud iam service-accounts create dns-user
$ export DNS_USER_EMAIL="$(gcloud iam service-accounts list --format=json | jq -r '.[] | select(.email | startswith("dns-user@")) | .email')"
$ echo $DNS_USER_EMAIL
[email protected]
$ gcloud projects add-iam-policy-binding $PROJECT_ID --member="serviceAccount:$DNS_USER_EMAIL" --role='roles/dns.admin'
We will need to save the service account credentials as a secret to be consumed in our Kubernetes manifests:
$ gcloud iam service-accounts keys create deploy/.keys/dns-user.json --iam-account $DNS_USER_EMAIL
$ kubectl create secret generic dns-svc-acct-secret \
    --from-file=credentials.json=deploy/.keys/dns-user.json
Install Helm
Next we need to install Helm, the Kubernetes package manager:
$ kubectl create serviceaccount -n kube-system tiller
$ kubectl create clusterrolebinding tiller-binding \
    --clusterrole=cluster-admin \
    --serviceaccount kube-system:tiller
$ helm init --service-account tiller
$ helm repo update
Install cert-manager
Now it’s time to install cert-manager using Helm:
$ helm install --name cert-manager \
    --namespace kube-system stable/cert-manager
Provision Issuer and Certificate manifests
cert-manager takes a really neat approach and introduces two new Kubernetes resource types, Issuer and Certificate.
Issuer defines a certificate issuer - i.e. where you can get a certificate from. We’ll define two: one for Let’s Encrypt’s staging endpoint, and one for the production endpoint. We’ll go straight to using the production endpoint, but staging should generally be used first since the rate limiting is more permissive, so if you run into errors you can debug them quicker before you cut over to production.
Certificate defines the structure of the X.509 certificate we want issued and specifies which method to use to validate it (HTTP or DNS).
I’ve added manifests for these two resources under the deploy/k8s/ssl folder, which we haven’t interacted with yet. Go ahead and read the .yml files to see how they’re structured, then let’s use our template script to fill in the needed values (also supplying a new EMAIL value, which Let’s Encrypt may use to notify us if our certificate is nearing expiration):
$ EMAIL='[email protected]' deploy/template.sh
deploy/k8s/configmap-nginx-conf.yml
deploy/k8s/configmap-nginx-site.yml
deploy/k8s/deploy-web.yml
deploy/k8s/ingress-ipv4.yml
deploy/k8s/ingress-ipv6.yml
deploy/k8s/jobs/job-migrate.yml
deploy/k8s/service-assets.yml
deploy/k8s/service-web.yml
deploy/k8s/ssl/certificate.yml
deploy/k8s/ssl/issuer.yml
$ kubectl create -f deploy/k8s/ssl/issuer.yml
clusterissuer "letsencrypt-staging" created
clusterissuer "letsencrypt-prod" created
$ kubectl create -f deploy/k8s/ssl/certificate.yml
certificate "captioned-images-tls" created
Once we provision the Certificate, cert-manager should begin contacting the Let’s Encrypt server and doing the ACME validation dance. We can check on the progress with:
$ kubectl describe certificate
The “Events” section is where to look to keep an eye on the progress. Once finished successfully (it may take several minutes), it should look like something like this:
Events:
  Type     Reason                 Age              From                     Message
  ----     ------                 ----             ----                     -------
  Warning  ErrorCheckCertificate  4m               cert-manager-controller  Error checking existing TLS certificate: secret "captioned-images-tls" not found
  Normal   PrepareCertificate     4m               cert-manager-controller  Preparing certificate with issuer
  Normal   PresentChallenge       4m               cert-manager-controller  Presenting dns-01 challenge for domain assets-captioned-images.abevoelker.com
  Normal   PresentChallenge       4m               cert-manager-controller  Presenting dns-01 challenge for domain captioned-images.abevoelker.com
  Normal   SelfCheck              4m               cert-manager-controller  Performing self-check for domain captioned-images.abevoelker.com
  Normal   SelfCheck              4m               cert-manager-controller  Performing self-check for domain assets-captioned-images.abevoelker.com
  Normal   ObtainAuthorization    2m               cert-manager-controller  Obtained authorization for domain assets-captioned-images.abevoelker.com
  Normal   ObtainAuthorization    2m               cert-manager-controller  Obtained authorization for domain captioned-images.abevoelker.com
  Normal   IssueCertificate       2m               cert-manager-controller  Issuing certificate...
  Normal   CeritifcateIssued      2m               cert-manager-controller  Certificated issued successfully
  Normal   RenewalScheduled       2m (x2 over 2m)  cert-manager-controller  Certificate scheduled for renewal in 1438 hours
At this point we’ll also have a new secret of type kubernetes.io/tls which contains the actual SSL/TLS certificate:
$ kubectl get secrets --field-selector=type="kubernetes.io/tls"
NAME                   TYPE                DATA      AGE
captioned-images-tls   kubernetes.io/tls   2         20m
Attach certificate to Ingresses
Now that we have our certificate, it’s time to attach it to our Ingresses so that SSL starts working!
I have put the changes to our Ingress and other manifests on a separate git branch named “ssl”; let’s check that out now:
$ git fetch
$ git checkout ssl
If we compare the changes between the master and ssl branch, this is what we added to the Ingresses:
diff --git a/deploy/templates/k8s/ingress-ipv4.yml b/deploy/templates/k8s/ingress-ipv4.yml
index 1283910..b6ada67 100644
--- a/deploy/templates/k8s/ingress-ipv4.yml
+++ b/deploy/templates/k8s/ingress-ipv4.yml
@@ -5,6 +5,11 @@ metadata:
   annotations:
     kubernetes.io/ingress.global-static-ip-name: captioned-images-ipv4-address
 spec:
+  tls:
+  - secretName: captioned-images-tls
+    hosts:
+    - ${DNS_WEBSITE}
+    - ${DNS_ASSETS}
   rules:
   - host: ${DNS_WEBSITE}
     http:
diff --git a/deploy/templates/k8s/ingress-ipv6.yml b/deploy/templates/k8s/ingress-ipv6.yml
index 573bf75..c573b90 100644
--- a/deploy/templates/k8s/ingress-ipv6.yml
+++ b/deploy/templates/k8s/ingress-ipv6.yml
@@ -5,6 +5,11 @@ metadata:
   annotations:
     kubernetes.io/ingress.global-static-ip-name: captioned-images-ipv6-address
 spec:
+  tls:
+  - secretName: captioned-images-tls
+    hosts:
+    - ${DNS_WEBSITE}
+    - ${DNS_ASSETS}
   rules:
   - host: ${DNS_WEBSITE}
     http:
Let’s regenerate our manifests using the updated templates and apply the updated Ingress manifests:
$ EMAIL=[email protected] ./template.sh
$ kubectl apply -f deploy/k8s/ingress-ipv4.yml
$ kubectl apply -f deploy/k8s/ingress-ipv6.yml
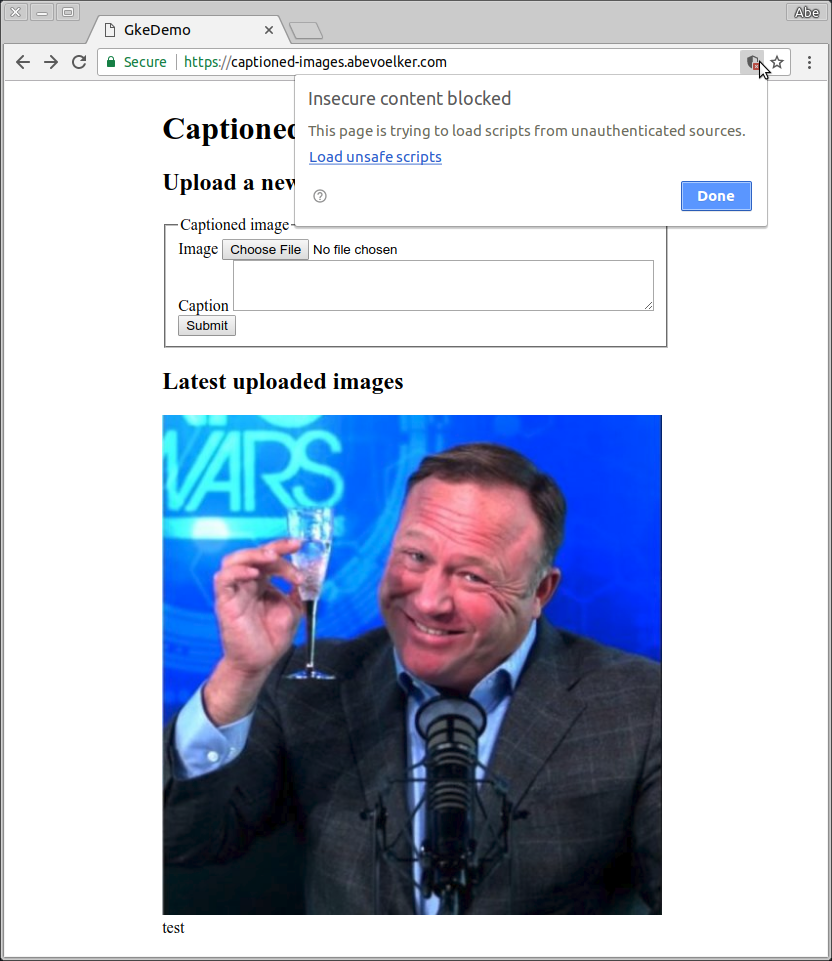
After a few minutes, you should be able to access your site using https://! It will look a little funky at first because Rails is still serving assets using http:// URLs, so Chrome and other modern browsers will refuse to load the assets (so the stylesheet will not load):

Let’s fix that now by applying the rest of the changes I made to the SSL branch, which will configure Rails and nginx to force everything to HTTPS:
$ kubectl apply -f deploy/k8s
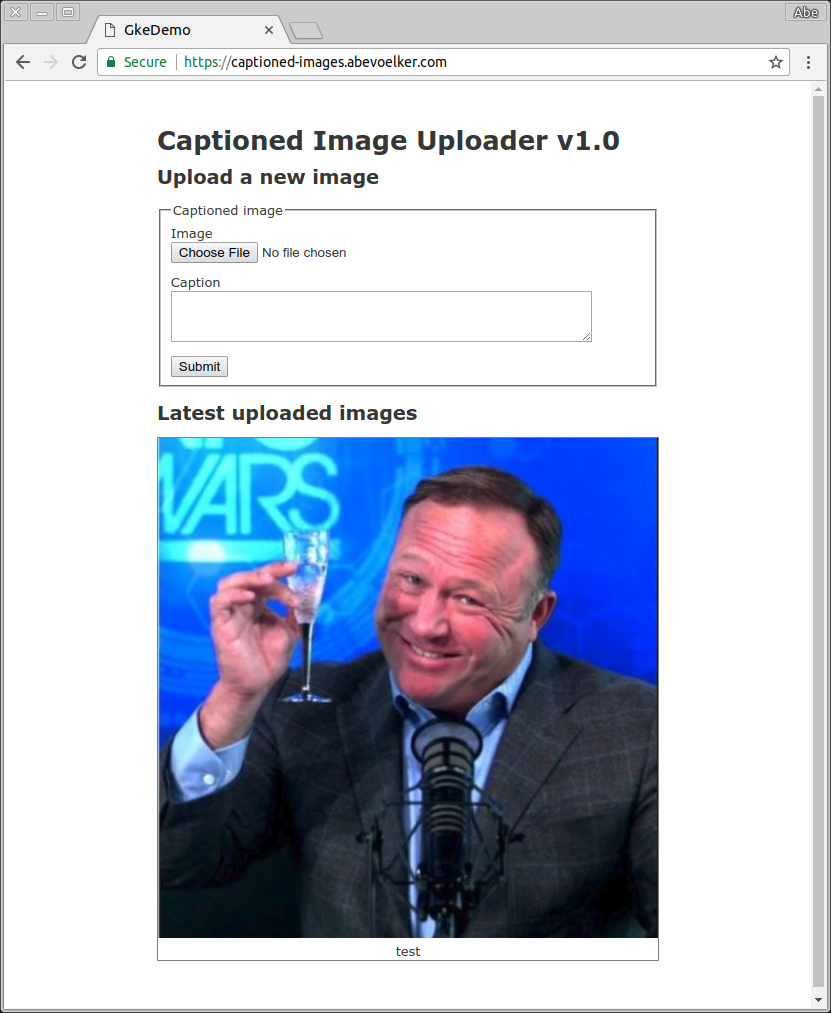
After the Deployment finishes updating, everything should be working over HTTPS without any warnings!

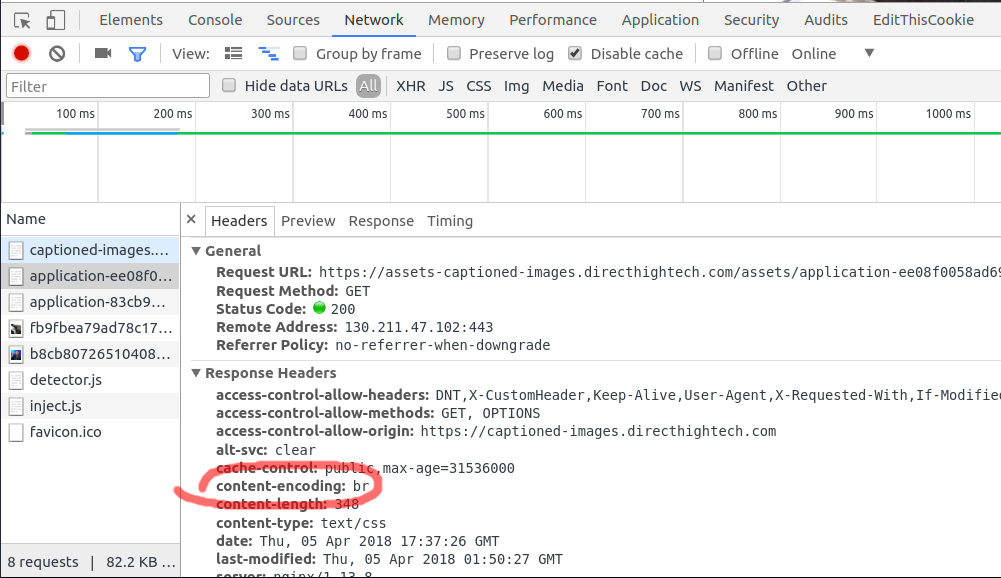
At this point Brotli compression will now be working as well, since Brotli requires HTTPS. Check the Network panel in Chrome and look for content-encoding: br in the response headers to verify:

Let’s ask Google to do better
Unfortunately, while tools like cert-manager and kube-lego are really neat, they still leave the responsibility for renewing certificates in our hands and increase the maintenance burden on our GKE clusters (e.g. what happens when we upgrade our Kubernetes version? Does cert-manager keep working?1). We have to keep an eye on a new spinning cog in our cluster and still set up health checks on certificate expirations lest we be surprised:
Great, kube-lego decided to break at some point and now I have an expired SSL cert. GCP's reliance on Kubernetes cluster-integrated tools like kube-lego, cert-manager, etc. is a big issue compared to AWS's ACM simplicity
— Abe Voelker (@abevoelker) March 22, 2018
If you agree that GCP should have a similar product to AWS’s ACM, please star the issue I opened requesting this feature.
End Part 4
That’s all for Part 4.
Join me next in the Part 5, the grand finale where we’ll wrap up with some conclusions and list further topics to explore!
Thank you
HUGE thanks to my reviewers, Daniel Brice (@fried_brice) and Sunny R. Juneja (@sunnyrjuneja) for reviewing very rough drafts of this series of blog post and providing feedback. 😍 They stepped on a lot of rakes so that you didn’t have to - please give them a follow! 😀
Any mistakes in these posts remain of course solely my own.
Footnotes
-
kube-lego for example has been deprecated and is no longer tested on the latest version of Kubernetes. ↩
