
Deploying a Ruby on Rails application to Google Kubernetes Engine: a step-by-step guide - Part 3: Cache static assets using Cloud CDN
Introduction
Update: I’ve now created a premium training course, Kubernetes on Rails, which takes some inspiration from this blog post series but updated with the latest changes in Kubernetes and Google Cloud and greatly simplified coursework based on feedback I got from these blog posts. All packaged up in an easy-to-follow screencast format. Please check it out! ☺️ - Abe
Welcome to part three of this five-part series on deploying a Rails application to Google Kubernetes Engine. If you’ve arrived here out-of-order, you can jump to a different part:
Part 1: Introduction and creating cloud resources
Part 2: Up and running with Kubernetes
Part 4: Enable HTTPS using Let’s Encrypt and cert-manager
Part 5: Conclusion, further topics and Rails extras
In order to accelerate static asset fetching, we should enable Cloud CDN. But we only want to enable it for our static assets, not our dynamic content - we don’t want our root page at / caching stale content and never showing new pictures that people upload. And some day we might add user accounts to our app, and we don’t want someone’s private /settings page being cached and displayed to everyone else who visits that path.
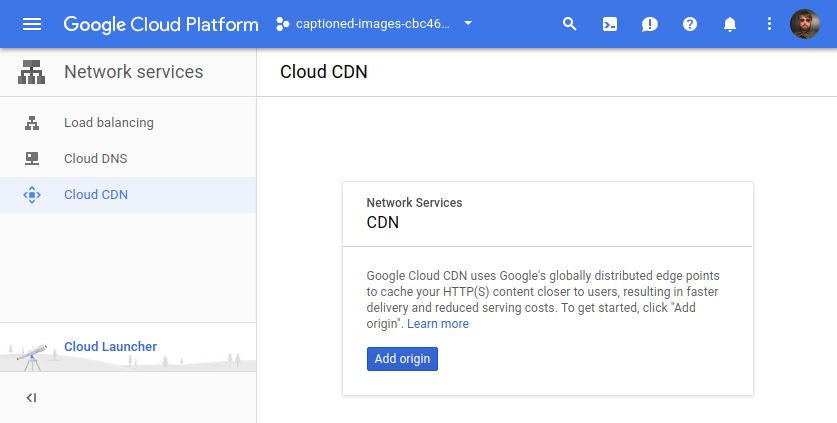
We’re not going to use the web console to actually enable Cloud CDN, but just to get a feel for how Cloud CDN works, if we were to visit the Cloud CDN web console page we’d be prompted to add an origin:
If we then clicked that button and then selected one of our Ingresses, we’d see this screen with some opaque choices for selecting “backend services”:
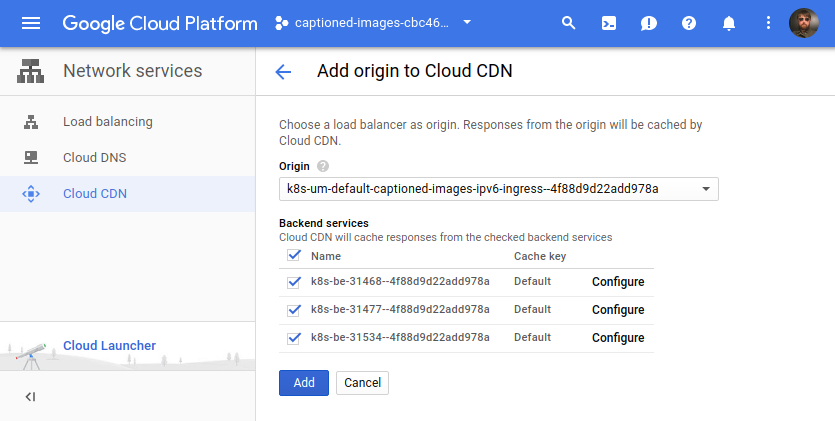
These backend services are a component of GCP’s load balancer. When using GKE, it seems that creating an Ingress creates a backend service for each Service linked to the Ingress.
GKE adds a “backends” annotation to the Ingress, so we can list them in human-readable form from the CLI with kubectl describe:
$ kubectl describe ing/captioned-images-ipv4-ingress
# look for the Annotations section in the output
or machine-readable form with kubectl get -o=json:
$ kubectl get ing/captioned-images-ipv4-ingress -o=json | jq -r '.metadata .annotations ."ingress.kubernetes.io/backends"'
{"k8s-be-31468--4f88d9d22add978a":"HEALTHY","k8s-be-31477--4f88d9d22add978a":"HEALTHY","k8s-be-31534--4f88d9d22add978a":"HEALTHY"}
Note: your backend service IDs will be different than mine
We can get more details on what each backend service is using gcloud:
$ gcloud compute backend-services describe --global "k8s-be-31477--4f88d9d22add978a"
# look for the "description" key in the output
If we run that command for each of the three listed backend services, we’d see one is for our static assets service, one is for our regular website service, and the last seems to be a default HTTP backend for Kubernetes (don’t ask me).
The static assets service is the one we want to enable Cloud CDN for, so when we find its ID we could use it to enable the correct backend service in the Cloud CDN web console, or programmatically with:
$ gcloud compute backend-services update --global "k8s-be-31477--4f88d9d22add978a" --enable-cdn
But we don’t want to go through this whole nasty manual process every time we want to use Cloud CDN with a GKE app. Luckily I wrote a script that automates this whole process - just give it an Ingress name and the corresponding Service name and it will enable Cloud CDN for the corresponding backend service:
$ deploy/enable-cloud-cdn.sh captioned-images-ipv6-ingress captioned-images-assets
enabling Cloud CDN for backend k8s-be-31477--4f88d9d22add978a
Updated [https://www.googleapis.com/compute/v1/projects/captioned-images-cbc464e43d1b/global/backendServices/k8s-be-31477--4f88d9d22add978a].
$ deploy/enable-cloud-cdn.sh captioned-images-ipv4-ingress captioned-images-assets
enabling Cloud CDN for backend k8s-be-31477--4f88d9d22add978a
No change requested; skipping update for [k8s-be-31477--4f88d9d22add978a].
(The backend service always seems to be the same for both Ingresses so the second command isn’t really necessary, but it doesn’t hurt anything so I always double check anyway - the script could maybe be improved here)
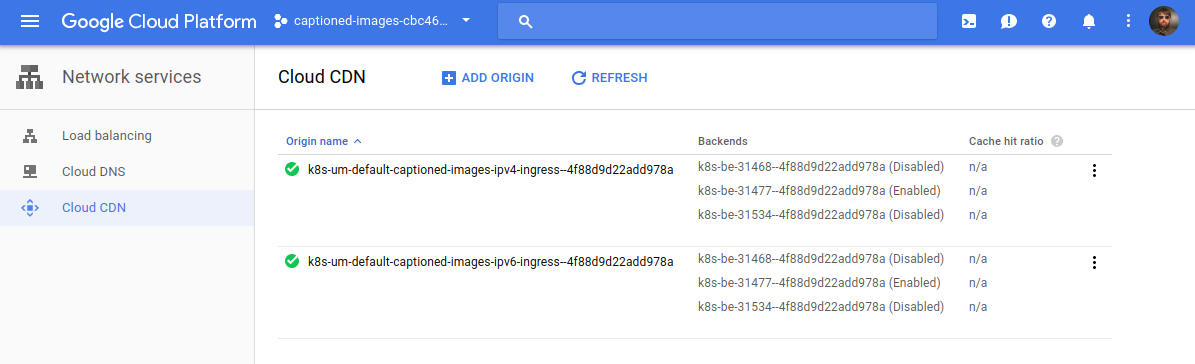
If we were to visit the Cloud CDN web console page again we’d now see the assets backend service has been CDN-ified across both Ingresses:
We can verify that Cloud CDN is working by making an HTTP request for a static asset and verifying that Age: appears in the response headers:
$ curl -I http://assets-captioned-images.abevoelker.com/assets/application-ee08f0058ad69a7cad88c4bfabd2595f037cc764cddf32ada35c6b5efabb26a8.css
HTTP/1.1 200 OK
Server: nginx/1.13.8
Date: Tue, 27 Mar 2018 02:22:03 GMT
Content-Type: text/css
Content-Length: 988
Last-Modified: Sun, 25 Mar 2018 19:14:27 GMT
Vary: Accept-Encoding
Access-Control-Allow-Origin: http://captioned-images.abevoelker.com
Access-Control-Allow-Methods: GET, OPTIONS
Access-Control-Allow-Headers: DNT,X-CustomHeader,Keep-Alive,User-Agent,X-Requested-With,If-Modified-Since,Cache-Control,Content-Type
Accept-Ranges: bytes
Via: 1.1 google
Cache-Control: public,max-age=31536000
Age: 454
(You can find a static asset URL by viewing the HTML source of your deployed app - there should be a hashed application.css and application.js URL to choose from)
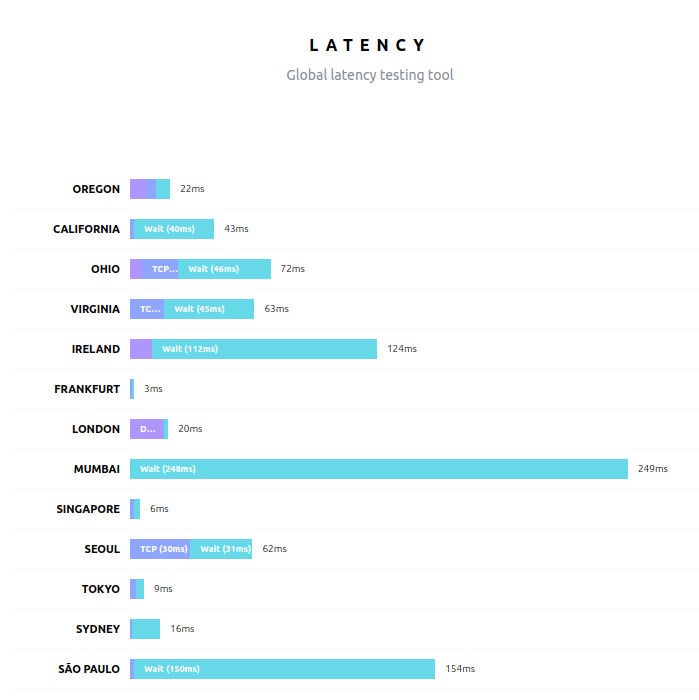
And now we can use a tool like this one using our application.css asset URL to verify it loads quickly (mostly) across the globe:
In my opinion, ideally GKE would support a special annotation on the Ingress manifest which would enable Cloud CDN for the backend service via Kubernetes. If you support that idea please star my Google issue requesting this feature.
Warning: when enabling Cloud CDN on an app that dynamically compresses responses (like this one), it is critical to properly set the Vary header. Otherwise you’ll have clients get unexpectedly-compressed responses and vice-versa. Check the nginx configuration of this demo app if you want to see how I do it.
End Part 3
That’s all for Part 3.
Join me next in Part 4 where we’ll enable HTTPS using Let’s Encrypt and cert-manager!
Thank you
HUGE thanks to my reviewers, Daniel Brice (@fried_brice) and Sunny R. Juneja (@sunnyrjuneja) for reviewing very rough drafts of this series of blog post and providing feedback. 😍 They stepped on a lot of rakes so that you didn’t have to - please give them a follow! 😀
Any mistakes in these posts remain of course solely my own.